Using a canvas as the dashboard surface, it was easy to set up bindings for
positioning meters by dragging, and bindings for editing meter configurations
interactively. Only slightly more challenging was the ``detachable" feature,
which permits the user to detach a meter entirely from the dashboard into a
separate toplevel, then replace it in its correct location at will.
For end-user convenience, the dashboard supports ``pseudokeywords":
the user/designer can define a pseudokeyword whose value is an evaluable
expression involving numeric constants, global variables, and one or more
other keyword names
(thus a pseudokeyword REMTIME can be defined as
EXPTIME - ELAPTIME so
that the user can easily make a count-down meter measuring remaining exposure
seconds). The expressions are entered in a simplified form which is
expanded and sanity-checked by the application before being evaluated. Expressions
are stored in both simple (for user editing) and expanded form.
Graphics are used to decorate the canvas, providing text labels, lines to
delimit groups of related widgets, and geometric shapes symbolizing, e.g.
hardware or software subsystems with which the user can interact. Bindings for
positioning and editing graphical objects are consistent with those for
meters.
The ability to evaluate expressions (for pseudokeywords) is also used to
implement ``conditions", boolean expressions involving keywords and
global variables, whose evaluated
result can be used to determine the configuration of dashboard elements.
Each meter or graphical object (including the canvas itself)
can be associated with not just one set of attributes, but an array
of attribute sets.
Each attribute set is associated with a condition controlling
the application of those attributes; the base set is associated with
a null or ``Normal" condition. The user/designer can easily and quickly add
more attribute sets and conditions, to make
objects on the dashboard surface change their appearance (such as content,
size, background/foreground colour, etc.) in response to KTL events.
The designer/user edits meter and graphic attributes,
establishes conditions, defines pseudokeywords, etc. using
GUI forms invoked interactively from the dashboard. The results of
these changes are immediately visible.
The application can be configured to display a
``transparent" graphic for an open
shutter (value of keyword SHUTTER is ``open"), and a black
(or larger, or both) graphic when the
shutter is closed; a large red warning
message can appear on the dashboard surface in response to an
undesirable condition.
Meters can ``turn red" when the value they represent exceeds a certain
limit; buttons can become inoperable when the instrument condition prohibits
their associated action. The attribute set of dashboard objects is the
list of their native Tk attributes, plus a small superset for the
designer's convenience (visible is one such convenient attribute).
In Figure 2, for example, the HATCH rectangle will be
solid black when the hatch
is closed, but hollow (as shown) when the hatch is open. The
horizontal arrows will
appear when light is passing between the stages of the instrument at the points
indicated, and will disappear when no light is present at those points. The
Image Rotator object will turn gray and fade almost into the background when the
rotator is out of the light path. Bitmaps representing glowing light bulbs will
appear when comparison lamps are turned on . . . and so forth. The chain
of ``photon arrows" is probably the most challenging of these animation
problems, and requires a chain of pseudokeywords with definitions as follows:
HATLIGHT
  "HATOPEN == 'open'"

ROTLIGHT
 "( ( HATLIGHT ) && ( ( IROTOUT ==
  'out of light path' ) ||
  ( IROTCVOP == 'opened' ) ) )"

LAMLIGHT
  "LAMPNAME != 'none' "

DSLIGHT
  "( ROTLIGHT || LAMLIGHT ) && ( SLITWID > 0 )"

SHUTLIGHT
  "( DSLIGHT ) && ( SHUTCLOS != 'closed' )"

COLLIGHT
  "( SHUTLIGHT ) &&
  ( ( ( COLLBLUE == 'blue' ) &&
  ( BCCVOPEN == 'opened' ) ) ||
  ( ( COLLRED == 'red' ) &&
  ( RCCVOPEN == 'opened' ) ) )"

...
The application can now use those pseudokeywords for conditional configuration
of graphics. The arrow between the Rotator and the Decker/Slit modules has
two conditions: invisible (normal) and ``lit". The ``lit" condition is
contingent on either a lamp being on or light getting through the rotator:
LAMLIGHT || ROTLIGHT
The GUI designer needs more flexibility in responding to conditions than merely
the alteration of the GUI appearance. Evaluable conditions are also used in
a simple error/warning message system with pop-ups, mailed or displayed messages,
and optional Tcl code to execute on any condition. The UI designer can easily
cause any arbitrary action to take place (including execs of shell commands,
delivery of mail messages, etc.) upon keyword-related conditions. In this
case the object is an Alarm, and has an associated array of conditions and
actions much like the condition/attribute arrays for visible objects.
Figure 3 shows the Alarm Editor.
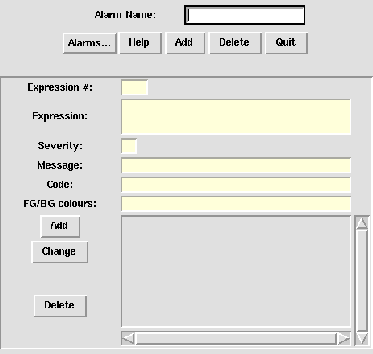
Figure 3: Pop-up editor for defining Alarms
Here is a sample alarm condition in simplified and expanded notation.
The simplified notation is what the designer entered into the Condition
box in the Alarm Editor.
( LAMPNAME == 'none' ) &&
  ( LMIRRIN == 'in light path' )

( \$hires(LAMPNAME) == 'none' ) &&
  ( \$hires(LMIRRIN) == 'in light path' )
As you can see, the expansion process consists of converting keyword names
and pseudokeyword names
to Tcl global variable references. After this, the expression can be
evaluated at uplevel #0 (evaluation in this case
takes place on any change to the value of
either LAMPNAME or LMIRRIN).
If this expression is true when evaluated, a message will appear in a popup
alert box:
No lamps, yet lamp mirror in. Occultation?
Upwards of 400 keywords are needed to control and monitor the DEIMOS instrument;
obviously there is not enough screen real estate on even the largest standard
monitors to display this much information at any reasonable size, nor can the
average user perceive and understand that much information at one time. Therefore
the dashboard needs hierarchy; it can invoke and dismiss sub-dashboards offering
detailed control, while presenting an overview of the system at the topmost,
introductory screen. The mechanism for invoking sub-dashboards is the familiar
and intuitive ``double-click" used in many window systems to unfold or invoke
windows, bound to any graphical object; however, the user/designer can attach
any Tcl code to the double-click binding, as well as or instead of the procedure
call to invoke a subdashboard.
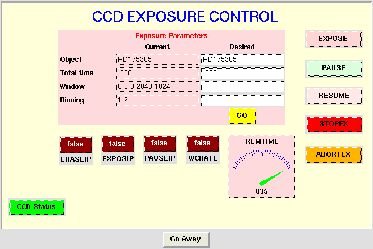
Figure 4: Sub-dashboard invoked from HIRES main dashboard
Figure 4 shows a subdashboard which was invoked from the CCD stage of the
main HIRES dashboard with a double-click. This subdashboard offers more
detailed control of the CCD control subsystem. The ``CCD Status" button
offers a third level of detail (Figure 5) in which a BLT graph widget is
used to plot detector temperature against the liquid nitrogen level in
the dewar. The PS button makes a PostScript file of the current
plot.
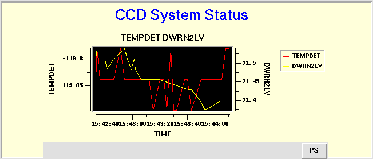
Figure 5: Sub-sub-dashboard invoked from CCD Status button
For design flexibility, the dashboard supports three hybrid
screen items: a generic Button, generic Menu, and generic Entry widget.
Unlike a Meter, these items are not bound to any particular keyword,
and unlike a Graphic they are standard Tk widgets embedded in a
canvas, not native canvas items. The user/designer can configure the
generic menubutton and button's ``command" attribute freely, to execute
any arbitrary Tcl code; the generic entry widget can be associated with
any global variable (for example, if the application requires the
UI to display Desired as well as Actual values simultaneously).
These generic widgets support the same conditional attribute mechanism
as the other dashboard components. (Example: several
of the stage labels in Figure 1 are actually menus offering control of
the covers or other basic functions for the optical stages. The menu items
would be, e.g., ``Open Cover," ``Close Cover," ``Into Light Path,"
``Out of Light Path.")
The dashboard operates in several (nonexclusive) modes. In ``engineering" mode,
the user can edit the dashboard freely; each writable Meter has individual edit and
commit buttons, and some extra function buttons are provided in the frames
around the central canvas. In ``observer" mode, the screen is smaller and
less complicated, omitting extra function buttons and invidual Meter buttons.
In ``developer" mode, Meters have large obtrusive
frames which make them easy to reposition and edit, whereas in ``deployment"
mode these frames are invisible and the user can neither reposition nor edit items
on the screen. In ``safety" mode, where any KTL write command would normally
have been executed the application will instead log a message to stderr.
In ``fake" mode, the dashboard will not even try to connect
to a KTL service but will use fake values for all keywords; this permits early
design to be done before the supporting keyword libraries are compiled, or
before a running instrument control system is available.
Release 1 of the dashboard knows how to use the VU Dial Gauge, Bar Gauge, and
Stripchart meters, the BLT plot meter, and the TkTurndial meter. It also
provides a TextBox (decorated entry widget), Odometer (undecorated entry
widget), Grid (gridded frame of entry widgets with actual and desired values),
On/Off Light, and Keyword Action button. It offers the Line, Rectangle, Oval,
Arc, Polygon, and Bitmap canvas items as graphics, and the non-keyword
Button, Menu, and Entry. It supports conditional configuration of all
meters and graphics, and
delivery of alarms (or any arbitrary Tcl code execution) on any
condition. A command-line window and a simple script editor are provided
for the user, for the direct typing of Tcl commands as an alternative to
GUI interaction. Screen layout can be saved to and reloaded from plain
ASCII files; all pseudokeyword and condition information is saved as well
as the layout and configuration of the main and all sub-dashboards.